Deployment (Bring-Up)
Running the VCF bring-up wizard — SDDC Manager deployment, validation, and initial cluster formation.
Phase 3: The Deployment
Deploy the VCF SDDC Manager Appliance
You will deploy the VCF SDDC Manager Appliance OVA onto your Secondary (Supporting) vSphere Cluster. Use the configuration table below during the OVA deployment wizard.
| Parameter | Value |
|---|---|
| OVA File | VCF-SDDC-Manager-Appliance-9.0.2.0.25151285.ova |
| VM Name (Display) | installer |
| Hostname | installer.pgnet.io |
| Root Password | VMware123!VMware123! |
| Local User (vcf) Password | VMware123!VMware123! |
| IP Address | 10.200.1.30 |
| Subnet Mask | 255.255.255.0 |
| Default Gateway | 10.200.1.1 |
| DNS Servers | 10.200.1.240 |
| Domain Name | pgnet.io |
| Domain Search Path | pgnet.io |
| NTP Servers | 10.200.1.240 |
- Network Connection: Ensure the VM network interface is attached to a Port Group on the Supporting Cluster that has Layer 2 adjacency or routing to VLAN 201.
- Verification: After deployment, wait for the appliance to boot and verify you can access the UI at
https://installer.pgnet.io.
The Deployment Wizard (Bring-Up)
-
Access the Installer UI: Navigate to
https://installer.pgnet.ioand log in using the useradmin@localand the Local User (vcf) Password defined in the table above (VMware123!VMware123!). -
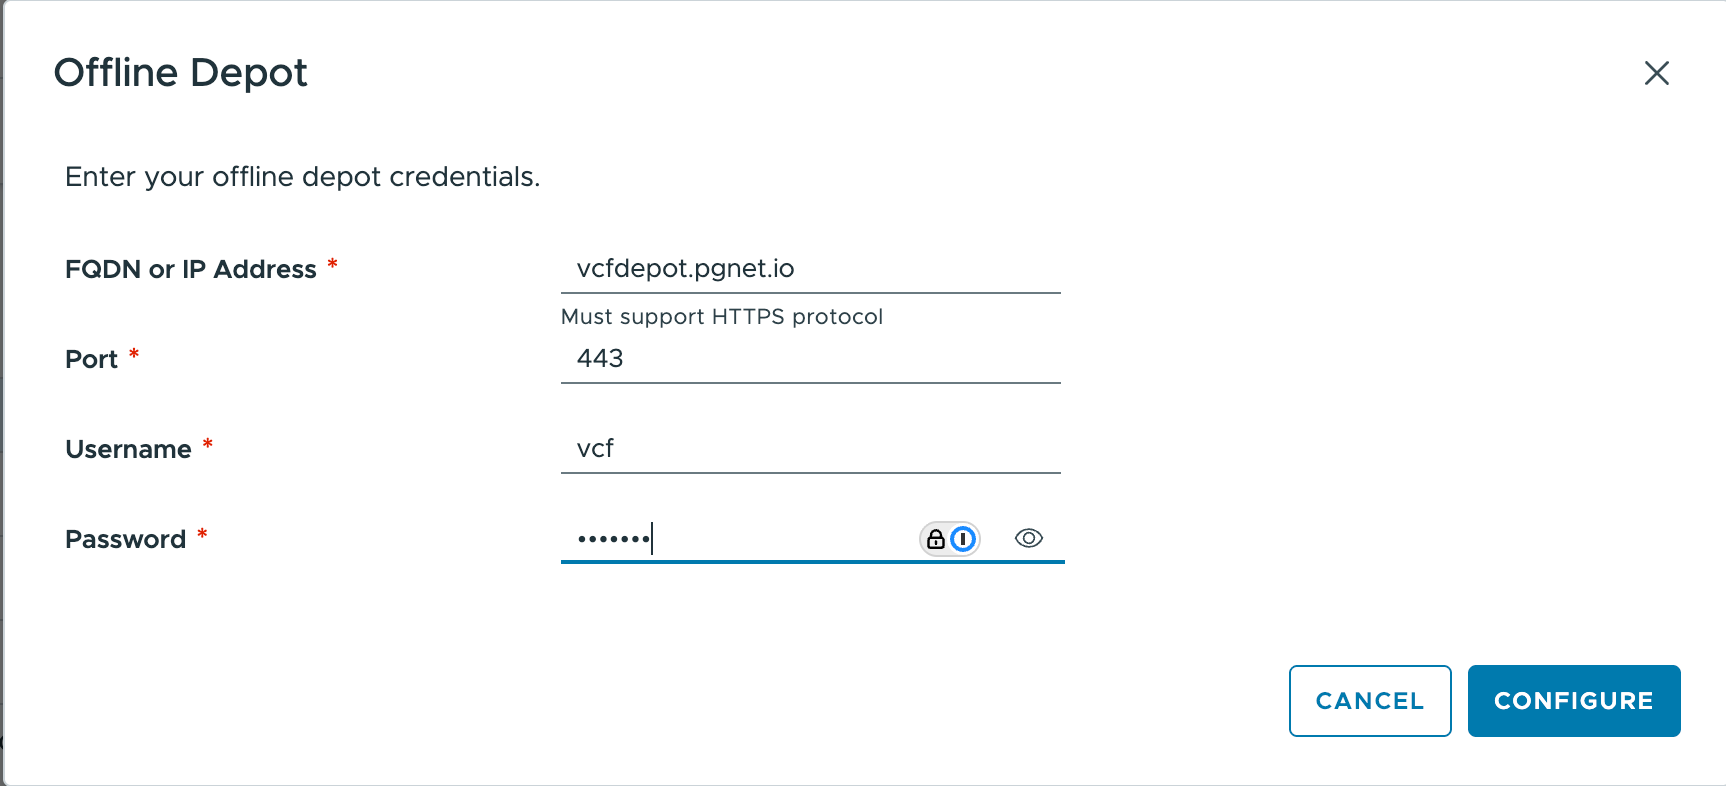
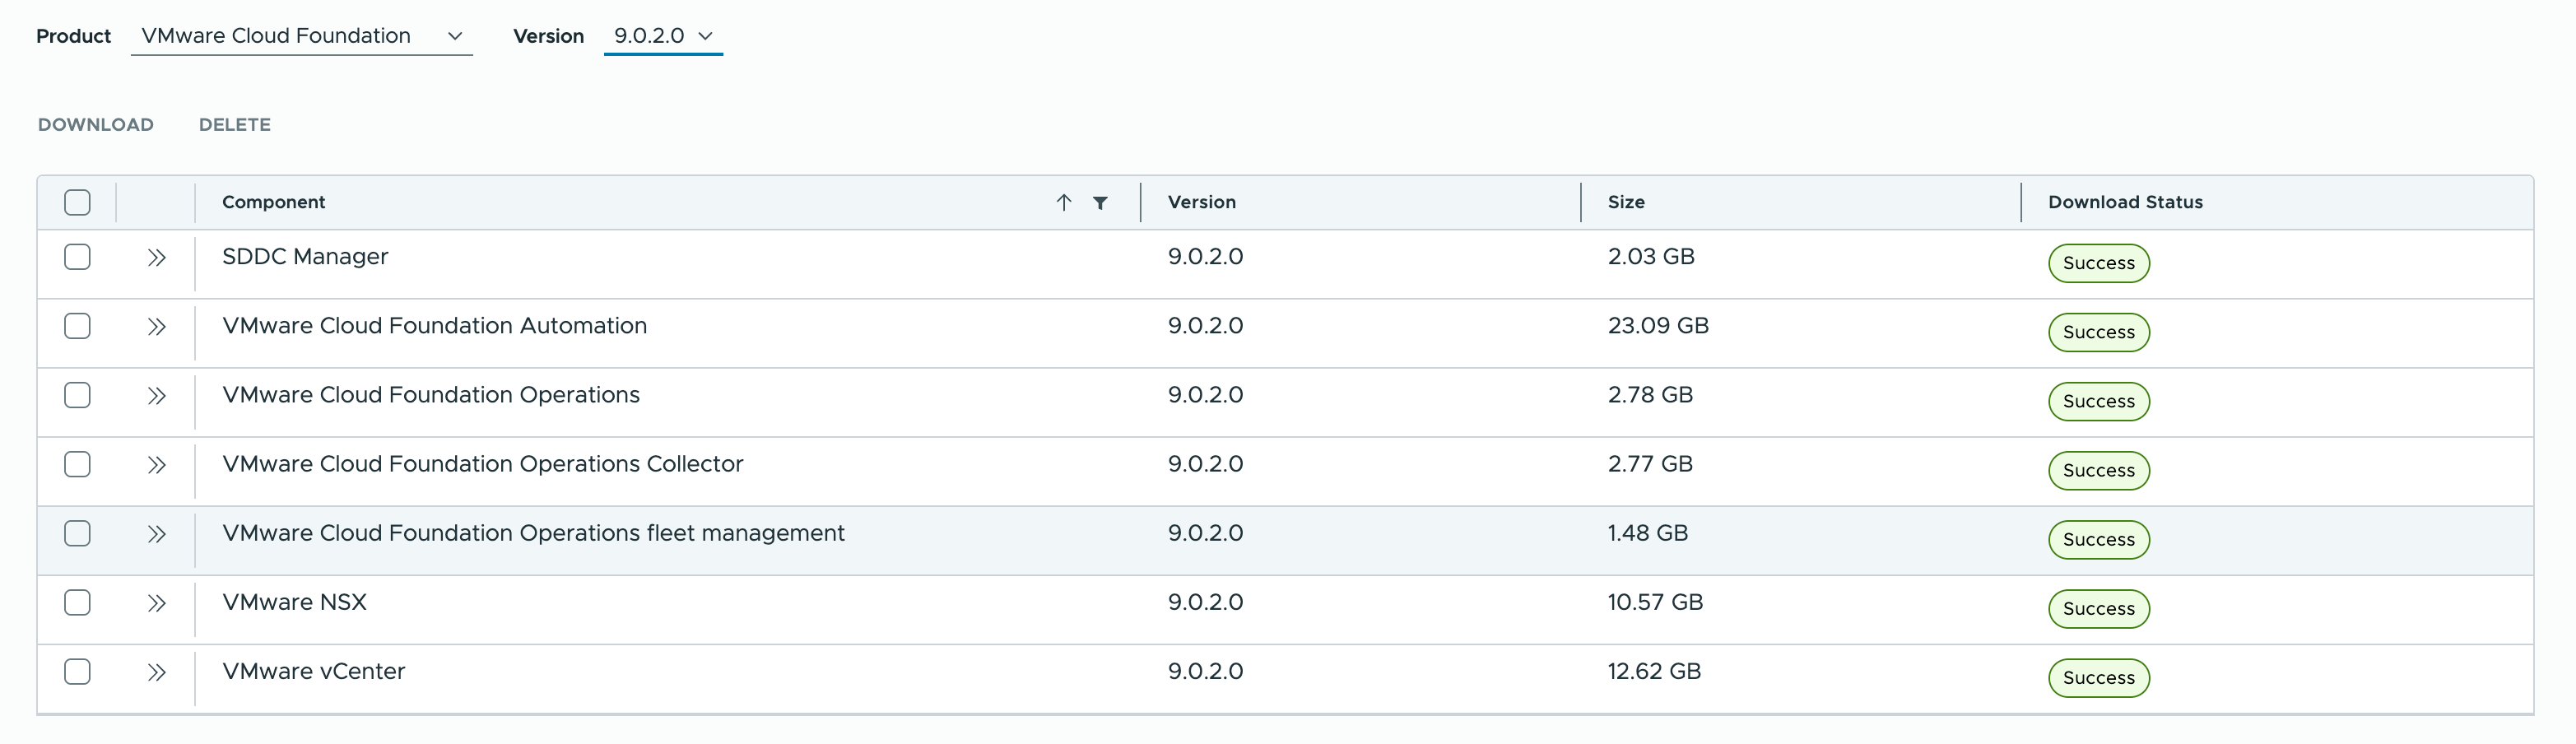
Connect Depot & Download: In the installer UI, connect to your Depot (or point to your Offline Depot if pre-seeded) and select VCF 9.0.2. Download the required components for the Management Domain.
-
Select version 9.0.2.0 and download all of components from
vcfdepot.pgnet.io
-
Wait until all downloaded. It takes about 20 minutes.
-
Deployment Spec (JSON/UI):
Using the deployment spec @
-
Validation: Run the pre-check.
- Critical Checks:
- DNS: Ensure forward/reverse lookups work for all hosts and services.
- NTP: Verify time sync is precise. Drifts >5 seconds can cause failure.
- MTU: Confirm Jumbo Frames (9000) are configured end-to-end on physical switches.
- Action: If validation fails, refer to Section 3.5 Troubleshooting below for
esxcliverification commands to run on the ESXi hosts.
- Critical Checks:
Validation & Construction
- Click Finish: The installer will convert itself into the SDDC Manager and push the full stack to the 3 hosts.
- Timeframe: Expect 2-3 hours.
- Credential Retrieval: Upon successful deployment, the system generates a variety of accounts across the stack. For a complete reference of the credentials configured in this specific deployment (including SDDC Manager, vCenter, NSX, and ESXi hosts), please refer to Appendix E: Appliance Credentials Reference.
3.4 JSON Configuration Reference
The following table summarizes key settings used in the deployment JSON. For the complete, importable JSON file, please refer to Appendix D.
| Category | Setting | Value |
|---|---|---|
| General | SDDC ID | pbmgmt |
| Instance Name | pbvcf1 | |
| Version | 9.0.2.0 | |
| Services | DNS | 10.200.1.240 (pgnet.io) |
| NTP | 10.200.1.240 | |
| vCenter | Hostname | vc.pgnet.io |
| SSO Domain | vsphere.local | |
| Size | small | |
| Cluster | Name | pgmgmt-cl01 |
| Datacenter | pgmgmt-dc01 | |
| vSAN ESA | Enabled | |
| NSX | VIP FQDN | nsx.pgnet.io |
| Manager 1 | nsxm1.pgnet.io | |
| Size | medium | |
| Overlay VLAN | 205 | |
| Skip Overlay on Mgmt | true | |
| Operations | Ops Node | ops.pgnet.io (Master) |
| Fleet Mgmt | fleet.pgnet.io | |
| Remote Collector | opscol.pgnet.io | |
| Automation | Hostname | auto.pgnet.io |
| IP Pool | 10.200.1.17, 10.200.1.26 | |
| Hosts | Host 1 | pgesxa1.pgnet.io |
| Host 2 | pgesxa2.pgnet.io | |
| Host 3 | pgesxa3.pgnet.io | |
| Networking | Mgmt | 10.200.1.0/24 (VLAN 201) |
| vMotion | 10.200.2.0/24 (VLAN 202) | |
| vSAN | 10.200.3.0/24 (VLAN 203) | |
| MTU | 9000 (All Data Networks) | |
| SDDC Manager | Hostname | sddc.pgnet.io |
3.5 Troubleshooting Common Bring-Up Issues
If the Validation step fails, SSH into the ESXi hosts (pgesxa1, pgesxa2, pgesxa3) and run the following verification commands.
1. DNS Resolution Check Ensure the host can resolve the SDDC Manager and itself.
# Check configured nameserver
esxcli network ip dns server list

# Test resolution
nslookup sddc.pgnet.io
nslookup pgesxa1.pgnet.io
2. NTP Synchronization Check Time drift is the #1 cause of authentication failures during bring-up.
# Check service status
esxcli system ntp get

# List sources and offset (Look for '*' denoting active sync)
# Note: You may need to look at /var/log/syslog.log if ntpq is not available in shell,
# or use the standard query:
esxcli system ntp test

# Example of Successful Output:
# [root@pgesxa2:~] esxcli system ntp test
#    Comments:
# Service analysis started on host: pgesxa2.pgnet.io,
# Test started at: 2026-02-03T22:14:22Z,
# Time Service is administratively enabled.,
# Verifying NTP service.,
# NTP server: 10.200.1.240 resolves IPv4: 10.200.1.240,
# Virtual NIC vmk0 : Admin: Up,
# IP Interface: vmk0 IPv4 Address: STATIC 10.200.1.222,
# IP Interface: vmk0 connected to Management Network on vSwitch0,
# IP Network Stack: defaultTcpipStack,
# Physical NIC vmnic1 : Admin: Up Oper: Up,
# Firewall Rule: ntpClient allows traffic on port: 123,
# Firewall Rule: ntpClient allows all IPs,
# ntpd is running, PID: 2099832,
# Kernel clock type: ntp,
# NTP is in sync ,
# Peering with: 10.200.1.240,
# Stratum: 5,
# Accuracy to within: 483.728500 msecs,
# Polling every: 64 secs,
# Network delay round trip: 13.744000 msecs,
# Difference from remote clock: -0.086191 msecs,
# Service analysis completed.
#    Timeinsync: true

# Check NTP peers using ntpq (Standard utility)
ntpq -p

# Example of Successful Output:
# [root@pgesxa2:~] ntpq -p
#      remote           refid      st t when poll reach   delay   offset  jitter
# ==============================================================================
# *pglin1.pgnet.io 139.99.135.247   4 u    -   64  177    0.242   -0.122   0.093
# +10.200.10.75 (p 139.99.135.247   4 u   61   64   77    0.568   -0.075   0.063
3. MTU / Jumbo Frame Check Verify that the physical switch supports 9000 byte frames. Since vMotion/vSAN interfaces (vmk1/vmk2) are not fully configured until after deployment, we perform an initial validation using the Management Interface (vmk0).
Note: Testing vmk1 or vmk2 is only possible post-deployment. The test below confirms the physical uplink and gateway can handle Jumbo Frames.
# Syntax: vmkping -I <interface> -d (do not fragment) -s <size> <target_ip>
# Size 8972 = 9000 MTU - 8 bytes ICMP header - 20 bytes IP header

# Initial Check: Test Management Interface (vmk0) to Gateway
vmkping -I vmk0 -d -s 8972 10.200.1.1

# Example of Successful Output:
# [root@pgesxa2:~] vmkping -I vmk0 -d -s 8972 10.200.1.1
# PING 10.200.1.1 (10.200.1.1): 8972 data bytes
# 8980 bytes from 10.200.1.1: icmp_seq=0 ttl=64 time=0.695 ms
# 8980 bytes from 10.200.1.1: icmp_seq=1 ttl=64 time=0.341 ms
# 8980 bytes from 10.200.1.1: icmp_seq=2 ttl=64 time=0.339 ms
#
# --- 10.200.1.1 ping statistics ---
# 3 packets transmitted, 3 packets received, 0% packet loss
# round-trip min/avg/max = 0.339/0.458/0.695 ms
4. Installer DNS Cache Reset If you modify DNS records on your infrastructure server to fix a validation error, the VCF Installer appliance may cache the old (incorrect) results. You must manually clear this cache on the appliance.
Steps:
-
SSH into the installer appliance (
installer.pgnet.io) asroot. -
Run the following command to flush the systemd-resolved cache:
systemctl restart systemd-resolved -
Retry the validation in the Installer UI.